 Internet Explorer 4.0 Setup Internet Explorer 4.0 Setup |
 |
|
Step 1
|
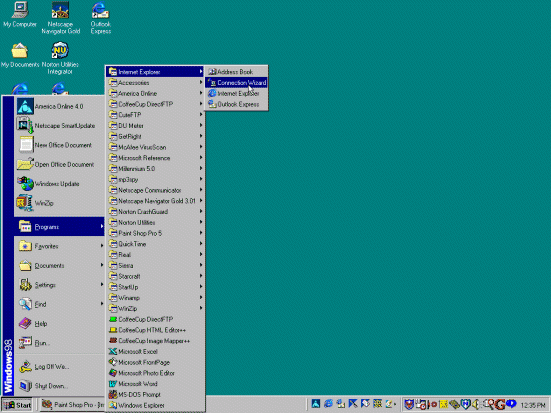
Click the Start Button, slide up Programs >> Internet Explorer >> Connection Wizard then left mouse click on the Connection Wizard to select it.
|
|
Step 2
|
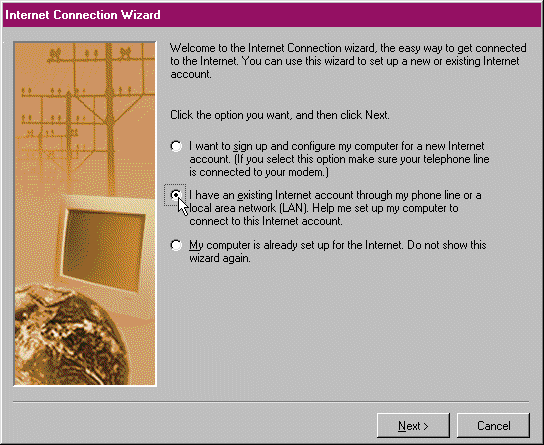
The next screen you should see should have three options to select, select the middle option then click the Next> button on the bottom of the window.
|
|
Step 3
|
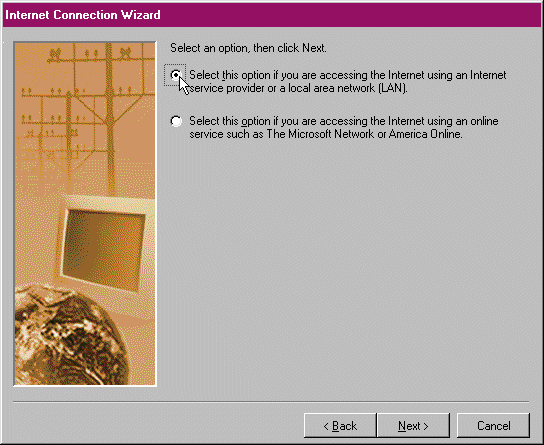
On this screen you will need to select the top option and then click the Next> button on the bottom of the window.
|
|
Step 4
|
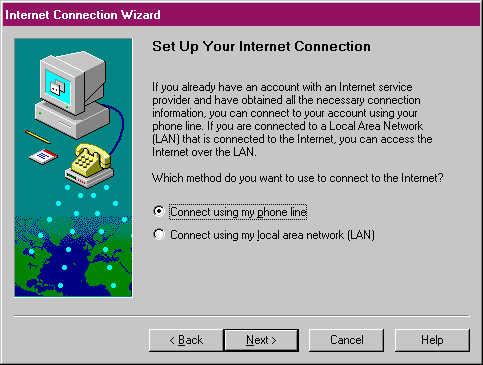
Then that window should disappear and a new one will appear which will look like the one above. On this screen you will need to select the Connect using my Phone Line and then press the Next> button on the bottom of the window.
|
|
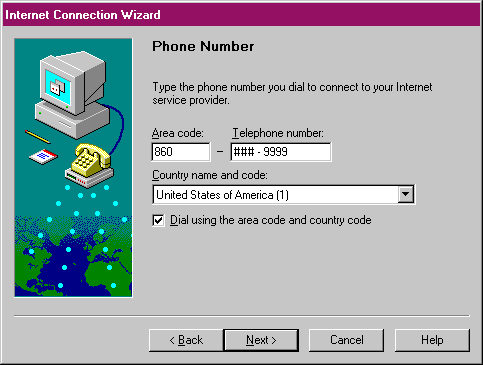
Step 5
|
Make sure your correct area code is displayed in the Area code box. In the Telephone number box you will need to enter a number from the list found here. Once you are done with this step hit the Next> button to continue.
|
|
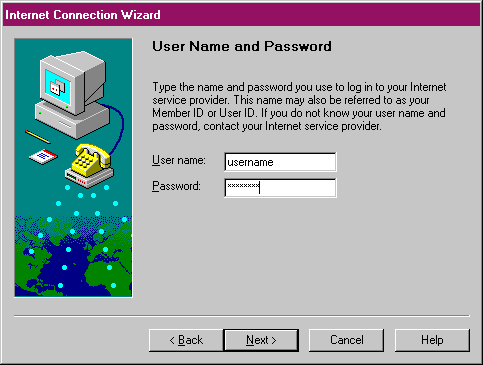
Step 6
|
If you need assistance with your password please check the starter info packet that you received after you signed up. If you still have questions you can contact us at the office at (860) 823-6227 or Toll free at 1-888-858-9990.
In this box you will need to put in your User/Login name and password in the corresponding boxes. For example, if your E-mail address is bob@99main.com then your User/Login name would be bob. Your password is the same that you chose when you first signed up with 99main. It is important that both your user name and password are in lower case letters and that there are no spaces contained in them.
|
|
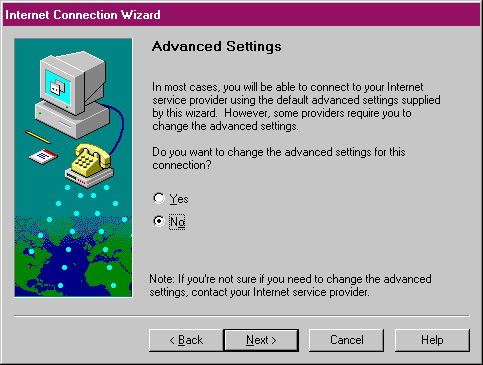
Step 7
|
You don't need to change anything in the Advanced Settings. Just make sure the No option is selected and then hit the Next> button.
|
|
Step 8
|
This window will ask for a Dial-up Connection Name. In the text box "Connection to ###-9999" this is incorrect. It should be highlighted already so to correct this hit the backspace key on your keyboard to clear the box out. Next, type in 99main. Click Next> to continue.

|
|
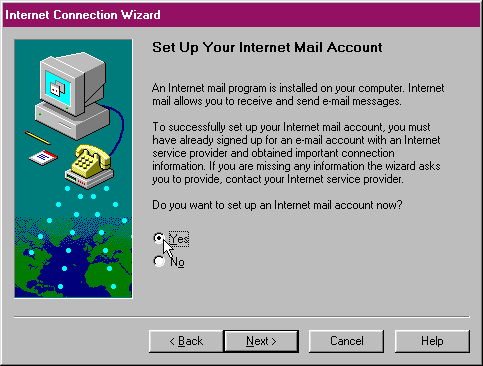
Step 9
|
Next, you will see a box asking if you want to set up your E-mail account, Left-click Yes and then click the Next> button on the bottom of the window.
|
|
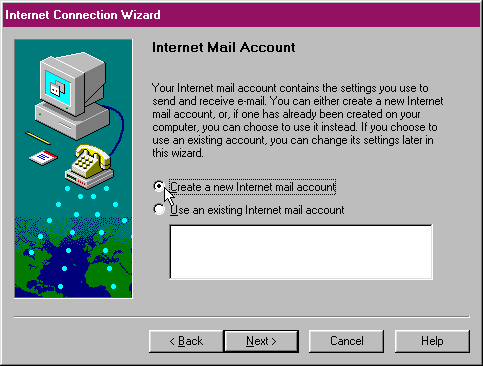
Step 10
|
If you see a screen asking to type in Display Name, Skip to step 11. Otherwise click on Create a new Internet Mail account, then click Next> button on the bottom of the window.
|
|
Step 11
|
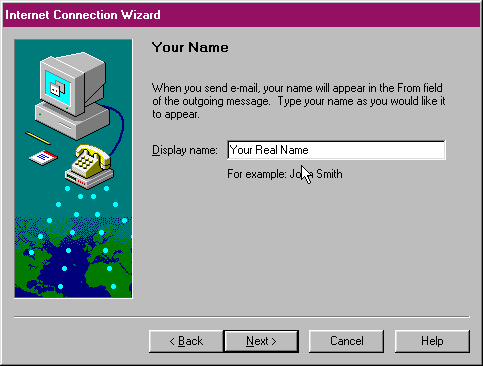
This screen will ask you to put in a Display Name. This will be your real name. This is just a label that will show up in the "from:" field of an E-mail message; upper and lower case characters can be used.

|
|
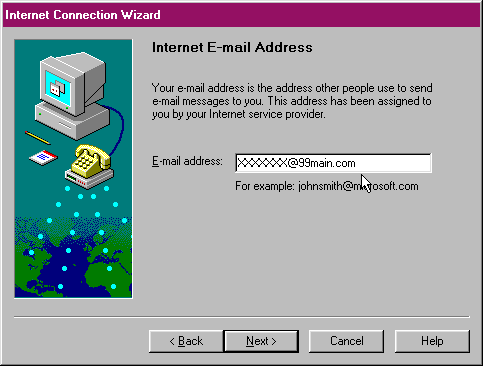
Step 12
|
On this screen you will need to put in your full E-mail address. This is your Login name with an @99main.com on the end (i.e.: bob@99main.com). It is also important that your entire address is in lower case and contains no spaces. Then click the Next> button on the bottom of the window.
|
|
Step 13
|
After you click Next> it will say that your E-mail address does not appear to be valid. It IS valid, just click the Yes button to continue.

|
|
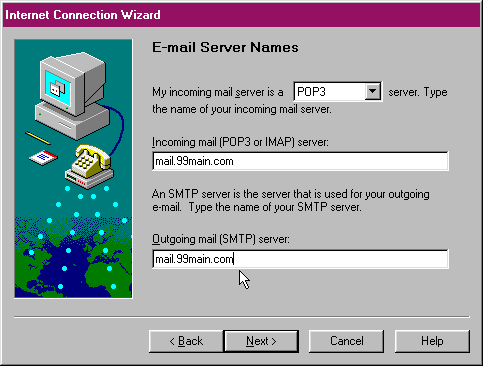
Step 14
|
In this step you will need to add the E-mail server names in order for your E-mail client to access your stored messages. My incoming mail server should read POP3. In the Incoming Mail (POP3 or IMAP) server, you will need to type in "mail.99main.com" (without quotes). In the Outgoing mail (SMTP) server you will have to type "mail.99main.com" (without quotes) again. It is important that they are in lower case with no spaces contained anywhere within. Once this has been confirmed click the Next> button on the bottom of the window.
|
|
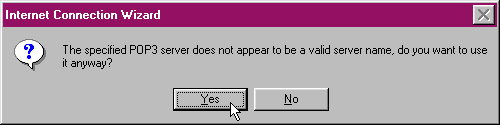
Step 15
|
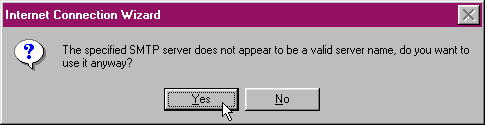
When you click next you will see two error messages. Simply click Yes to both messages to continue. They are different messages, notice one says POP3 and the other SMTP.
|
|
Step 16
|
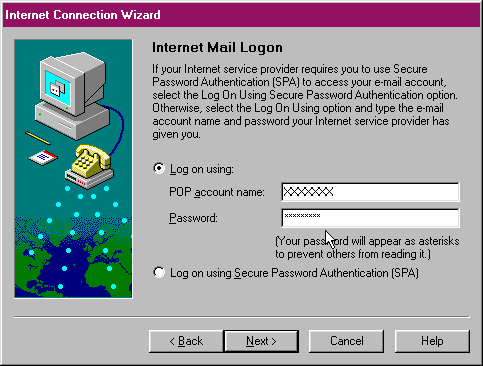
This screen will ask you for your Login name and password. Your logon/user name should already be in place, you will however need to put in your password. It will appear as ****** to prevent others from seeing your password. Once you have finished typing in your password click the Next> button on the bottom of the window.
|
|
Step 17
|
This step will ask you to put in a friendly name for you account. Clear the box out by pressing the back space key. Once cleared type in your logon/user name into the box. Once finished click Next> on the bottom of the window.

|
|
Step 18
|
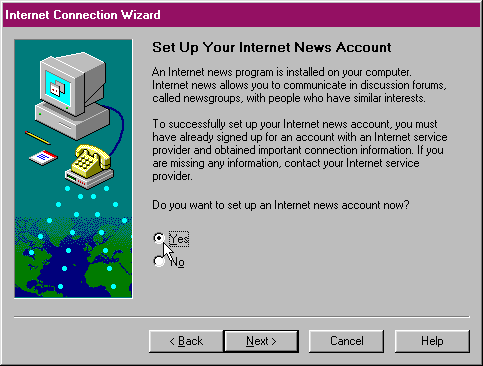
Next you will need to set up your Internet news account. Click on Yes then click the Next> button on the bottom of the window.
|
|
Step 19
|
If you see Display Name instead of this screen skip to the next step. If you see this screen then click on Create a new Internet news account, then click Next> on the bottom of the window.

|
|
Step 20
|
You should see you real name in the Display name box already. It has been filled in from previous information. If it is not correct please change it then click the Next> button on the bottom of the window.
|
|
Step 21
|
You should then see your E-mail address again. Please confirm that it is correct then click the Next> button on the bottom of the window.

|
|
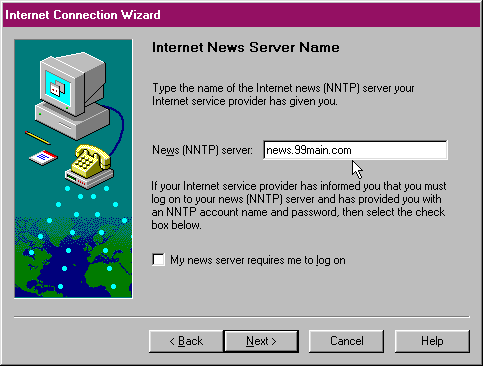
Step 22
|
It will then ask for the news server name. Type news.99main.com in the space provided. Once finished click the Next> button on the bottom of the window.
|
|
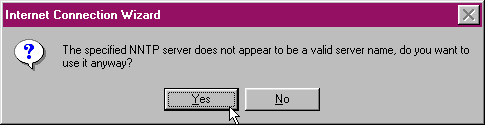
Step 23
|
It will then say that the news server name appears to be incorrect. Just click the Yes button to continue.
|
|
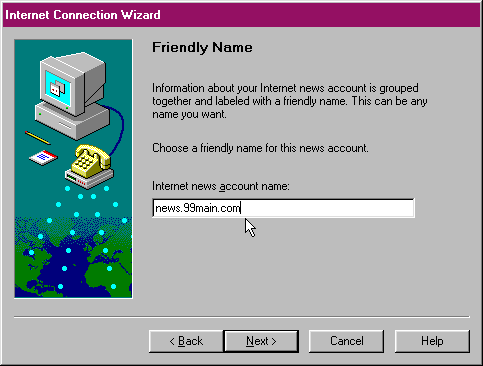
Step 24
|
Next it will ask for a friendly name, there is no need to rename this one so click the Next> button on the bottom of the window.
|
|
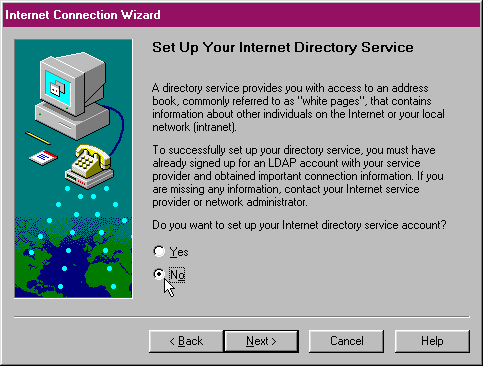
Step 25
|
The next step will ask you if you wish to setup your internet directory services. Click No then click the Next> on the bottom of the window.
|
|
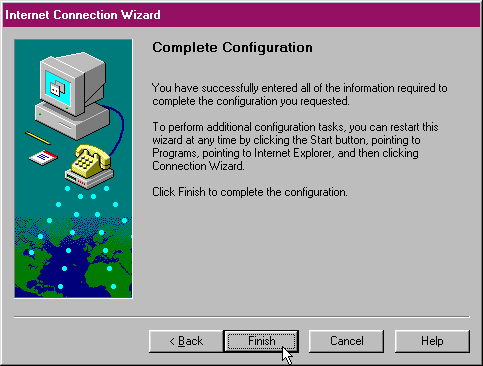
Step 26
|
Congratulations you've finished! Click on the Finish button on the bottom of the window to save your settings and begin using your E-mail.
|
. . . . . . . . . . . . . . . . . . . . . . . . . . . . . . . . . . . . . . . .
. . . . . . . . . . . . . . . . . . . . . . . . . . . . . . . . . . . . . . . .
. . . . . . . . . . . . . . . . . . . . . . . . . . . . . . . . . . . . . . . .
. . . . . . . . . . . . . . . . . . . . . . . . . . . . . . . . . . . . . . . .
|
|
|
|
 Saturday, July 25
 99main