 Dial-up Networking Setup Dial-up Networking Setup |
 |
|
Step 1
|
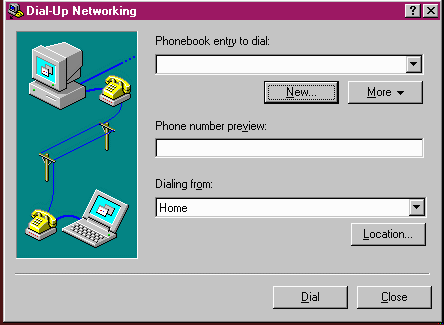
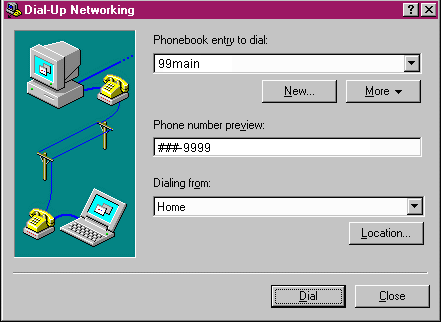
Click Start and go to Programs >> Accessories >> Dial-up Networking. You should see a screen like the one below. Click on the New... button to begin setup of your 99main connection.
|
|
Step 2
|
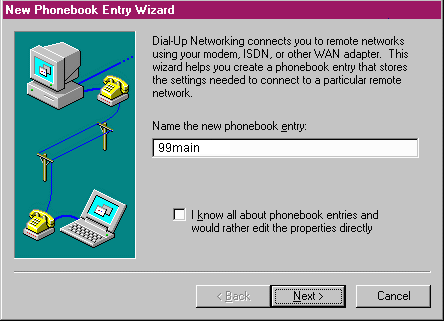
In the box enter the name 99main and then click Next>
|
|
Step 3
|
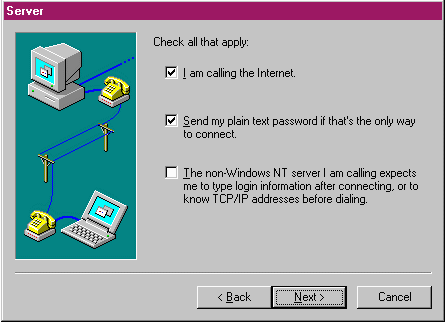
You will now see a screen with three check boxes inside. Make sure that you check I am calling the Internet and also Send my plain text password if that's the only way to connect. Verify that the last check box is NOT checked then click Next> on the bottom of the window.
|
|
Step 4
|
Next step is to choose an access number closest to you without having to dial long distance. To test this pick up your normal phone and try a few numbers that may work for you. If after you dial an number without having to dial long distance you can hear a modem squealing at the other end you have the correct number for your location.
814-9999 Bridgeport
419-9999 Cornwall
826-9999 Danbury
374-9999 Deep River
372-9999 Hartford
|
815-9999 New Haven
818-9999 Norwalk
382-9999 Putnam
414-9999 Southington
373-9999 Norwich
|
817-9999 Stamford
387-9999 Torrington
819-9999 Waterbury
|
|
|
Step 5
|
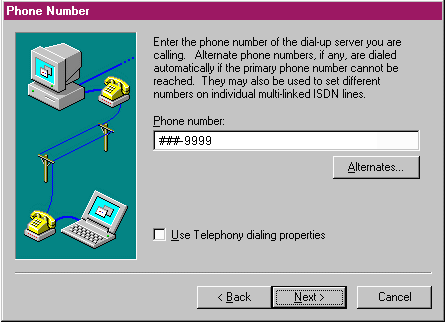
In the telephone number box type the access number for your area. Once this has been completed, click the button called Next> on the bottom of the window and then click Finish. You will return to the Dial-up Networking window.
Note: If you have call waiting on your line and would like to disable it while online you can do so by typing a *70, before the access number (i.e. *70, ###-9999) a comma must be included to separate the *70 from the local access number.
|
|
Step 6
|
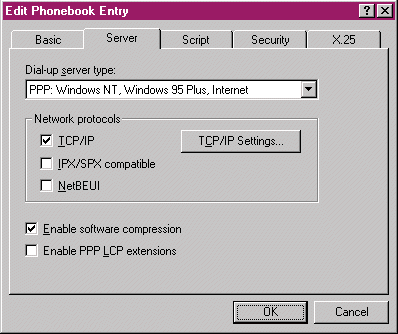
Click on the word More and then select Edit entry and modem properties. Click the Server tab on the top of the window. Make sure TCP/IP and Enable Software compression are checked. Verify that IPX/SPX, NetBEUI and Enable PPP LCP extensions are NOT checked. Once you have competed this step click on the button labeled TCP/IP Settings...
|
|
Step 7
|
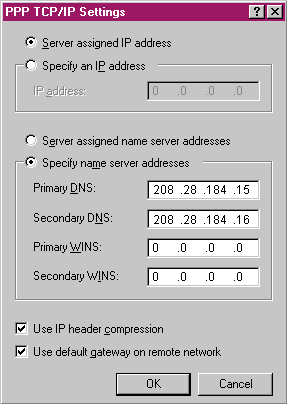
Click the option for Server assigned IP address. Click the option for Specify name server addresses. Enter 208.28.184.15 for Primary DNS; Enter 208.28.184.16 for Secondary DNS. Also ensure that the two check boxes at the bottom of the screen are checked. Then click the OK button to go back to Edit the phone book entry
Note: You do not need to put in any information into Primary and Secondary WINS.
|
|
Step 8
|
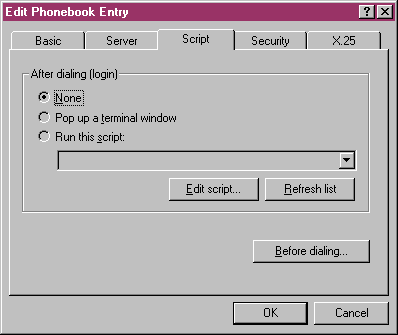
Under Script tab click on None. Do NOT click OK, instead click the Security tab.
|
|
Step 9
|
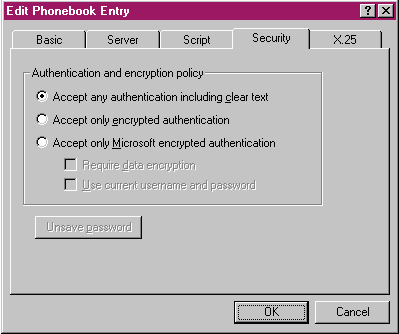
Click Accept any authentication including clear text. Click OK, you are now properly configured to connect to 99main.
|
|
Step 10
|
To access your dialer from this point forward you will need to go to Start >> Programs >> Accessories >> Dial-up Networking and make sure that 99main is the selected phonebook entry then click the Dial Button on the bottom of the window.
|
|
Step 11
|
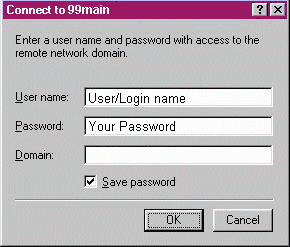
The last step is to enter your user/login name and password in the corresponding boxes. For example, if your E-mail address is bob@99main.com then your User/Login name would be bob. Your password is the same that you chose when you first signed up with 99main. Leave the box labeled Domain: empty. It is important that both your user name and password are in lower case letters and that there are no spaces contained in them.
If you need assistance with your password please check the starter info packet that you received after you signed up. If you still have questions you can contact us at the office at (860) 823-6227 or Toll free at 1-888-858-9990
|
. . . . . . . . . . . . . . . . . . . . . . . . . . . . . . . . . . . . . . . .
. . . . . . . . . . . . . . . . . . . . . . . . . . . . . . . . . . . . . . . .
. . . . . . . . . . . . . . . . . . . . . . . . . . . . . . . . . . . . . . . .
. . . . . . . . . . . . . . . . . . . . . . . . . . . . . . . . . . . . . . . .
|
|
|
|
 Thursday, February 19
 Thursday, February 19